If you know me you know I LOVE Mexican food... I think I could eat it every single day! I found this recipe for crockpot pulled chicken to use for tacos and it is SO good and SOOOO easy! I have made these tacos two times now and they are so delicious, you must try!
The steps are so easy! All you have to do is put
- 6 Boneless, skinless Chicken Breasts
- 1 Jar of Salsa
- 1 Packet of taco seasoning
Into the crockpot and stir it.
Turn it on Low for 6-8 hours OR High for 4-6 hours.
And then you're all set to go off to work or what ever your day brings and come back to some simple prep and an awesome Mexican meal!
At the end of time the chicken has in the crockpot you pull the chicken apart with a fork. It's super easy and falls right apart!
Another thing I made to go along with our Mexican meal was a Mexican White Cheese Dip! Such a yummy appetizer and addition to tacos and nachos!
Ingredients:
- 1/2 pound of white american cheese
- 1/4 cup of milk (maybe more if you want it thinner)
- 1 tablespoon of butter
- 1 (4 oz) can of green chili's
- Teaspoon of cumin
- Teaspoon of garlic salt
- Cayenne pepper - a pinch
Directions:
Place cheese, milk, and butter in a sauce pan over low heat.
Heat until melted - stirring frequently.
Stir in the green chilli's, cumin, garlic salt, and the cayenne pepper.
Add more milk to make it thinner if desired
Serve immediately with chips, tortillas, and your favorite mexican dish!
My family likes to put out bowls of lettuce, tomato, sour cream, cheese, and hot sauce and make a little taco toppings bar and each person can create whatever they desire with tortillas or chips!
Some of us prefer Tacos (above) and some of us like making a plate of Nachos (below) but we all enjoyed adding the white cheese dip to whatever our creation was!
If you like Mexican food you'll love this and how easy it is! So little effort and SO MUCH flavor!!!
A little bit of DIY and a little bit of recipe combined!!
The other day my friend and I took a trip to Giant after reading up on smoothie making 101. On the search for nuts, seeds, kale, spinach, fruit, etc... Well, we were lost and I think we went back and forth in some aisles one too many times... But, maybe that counts as exercise which will contribute to our new goals!
I know that I am always in a hurry because I never leave myself enough time to get ready because I am not a morning person and I rarely eat breakfast... Not good, I know! I also would never eat some of the things in the smoothies individually and I rarely get my recommended daily amount of fruit.
With these smoothie packs- they are already ready to go. Just need to be thrown in the blender with 1-2 cups of whatever liquid I want! Sounds easy enough and it's good for me? I can give that a shot.
Well, let's just get to it!
This is everything that we got! (combined for 2 people)
• Kale
• Spinach
• Quart sized Ziploc bags
• Flax Milk
• Flax Seeds
• Sunflower Nuts
• Oatmeal
• Fresh Bananas
• Frozen Strawberries, Blueberries, Berry Medley, and Pineapple
Some of the ingredients we already had in our pantries and keep in mind you DO NOT have to use these exact items!
From reading on other blogs and websites we came to the conclusion you need Nuts, Seeds, Oats, Fruit, and Greens and a liquid... but, you can pick any variation you want!
Nuts: We went with Sunflower nuts because it was easy to find in the store, on sale, and this is what other people online were using!
Seeds: We chose flax seeds. Now, to be honest, I am not up on all my health information but from what I read, they are good for you! They are high in most vitamin Bs, Rich in Omega-3 Fatty Acids, high in Fiber, and high in Phytochemicals.
Fruits: We chose to use frozen fruit for convenience and just grabbed every kind we liked that would go well in different combinations. We planned to make each of our bags a little different to give us some variation throughout the week.
Greens: We went with Kale and Spinach. They both seem to be popular, nutritious and what everyone else is using... good enough for me!
Liquid: We randomly came across Flax Milk in the organic aisle of the grocery store. We both bought unsweetened protein+ Flax Milk.
It has plant based protein, no lactose/gluten/tree nuts/soy, and 1200mg of omega 3s per serving.
Other suggestions we saw to add to your smoothies were water, coconut water, almond milk, regular milk, and fruit juices.
To start we put baggies out on the counter and rolled the tops down so they stayed open.
So basically this is what you need in each baggie...
1 Tbsp of nuts
1 Tbsp of seeds
1/4 cup oatmeal
1-2 cups mixed fruit (any combination you want)
Big handful of mixed greens & when you're ready to make your smoothie just add 1-2 cups of your liquid of choice
I labeled my bags with what fruit combination was in there so in the morning I can pick what kind of smoothie I want by simply reading the bag.
We tasted tested one of our smoothies when were were done.
This one has Blueberries, Strawberries, Blackberries, Raspberries, and Bananas!
It wasn't a complete fail, but I just think the recipe I used needs a little tweaking to meet my approval.
It didn't taste terrible but it didn't taste as much like fruit as I was expecting. I think they need more than 1 cup of fruit and maybe a little less nuts and seeds. The smoothie tasted too much like the seeds, nuts, and oats. I am sure that can be fixed by adding more fruit or using fruit juice as a liquid!
It might take a couple tries to get it tasting great but I am still willing to try! And if not, I can still power through drinking them once a day as they weren't THAT bad.
This is your first taste of the "Photographs" portion of this blog! If you "Like" my Photography Business on Facebook, you may have seen some previews of these photos already! And, well, if you don't you should ;)... you can find it HERE
And if you were unaware of and interested in seeing my Photography Blog for my business of all my sessions you can find that HERE!
I decided to post this session to my personal blog because it was just something Kayla and I went out and did for fun and it also includes some pictures where I am the model!
First of all, Kayla is one of my good friends from work! We went to the same high school but we didn't truly get to know each other until I helped her get a job where I work! The amount of great and life-long friends I have made at my job amazes me and I realize it was truly a blessing to find that job... But, thats just a tid bit about my life and a bit off topic, SOOOO...
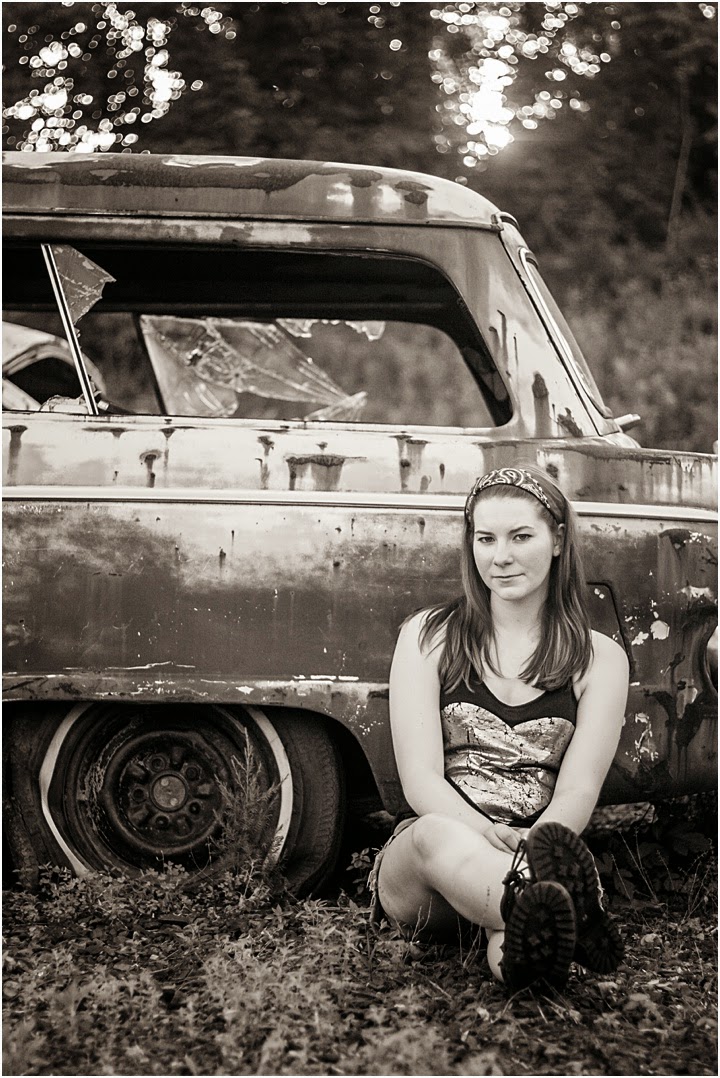
Kayla also has a interest in Photography as a hobby and wanted to go on a little adventure with me and see what she could learn! We went to a pavilion and talked photography and then went on a search for a junkyard as we already found ourselves in combat boots and visions of an edgy and out of the ordinary photo shoot!
Well, as you can see we found the perfect place! Here are some of my favorites from my night out with Kayla and our Canons!
Before Kayla and I went to the Junk Yard we sat down and talked Photography and I taught her how to do more things with the Canon DSLR she has had. I gave Kayla a crash course on the basics of Manual Photography because she wanted to get BEHIND the camera as well.
Well, it seems as though Kayla is a natural... Check out these awesome shots she got with me as the model :)
Today, my friend Kayla and I did some crafting and made some things for her apartment at school in the Fall!
Project #1:
Cork squares
Kayla bought a four pack of square cork pieces, acrylic paint in the colors she wants in her apartment, and a pack of stencils with all different shapes.
You can paint the cork however you want! You could write quotes, or wrap them in a fabric you like as well.
Kayla chose to paint two of her cork squares white, one blue, and one purple for the first step.
Kayla then used the stencils she got to paint patterns on them!
Here is the ALMOST finished product! (Kayla will make patterns on all of the boards when she has more time!)
She now has cute boards to hang on her wall to tack things like pictures, reminders, etc to!
Project #2:
"This Week"- "Next Week" dry erase calendar!
Kayla got two 11x14 frames in a pack for just $4 at Michael's Craft Store!!! She also picked 8 pieces of scrapbook paper that she liked and will match the theme of her apartment!
We cut each paper into 2 inch strips... 2 of each patterned paper (1 for each frame!)
Kayla then arranged the papers in an order she liked and over lapped the papers to fit right onto the inside of the backing of the frame. We then used Modge Podge to secure the pieces or paper.
After that, you just let them dry and repeat the steps for your second frame.
When they are all dry, you attach the back to the frame and flip it over and you're done.
You just use a dry erase marker on the glass and it wipes off and you can change it each week!
Here is Kayla's finished product for her to stay organized with assignments and schedules in the fall!
Kayla used a coupon I gave her for Michael's to get all her supplies and ended up spending under $20!
The coupon I found is valid from now until July 19th and you can find it HERE to print it out or redeem from your phone.
WELCOME!
My name is Sarah.
I am a Photographer, avid pinner, DIY-er, fashionista, and all around creative soul from the Philadelphia area. I'd love to share some laughs, crafts, and photographs with you! ;)